 Join Slack
Server Configuration and Software Installation
Here we are going to configure the servers’ network, install the netris-cloudstack agents on hypervisors, install CloudStack management software on Server 1, and install the CloudStack agent on Server 2-4.
Configuring Network on CloudStack Management Server (Server 1)
To set up the CloudStack Management Server (Server 1) effectively, we need to configure its network. The following steps describe how to prepare the server’s network interfaces, set up bonding for redundancy, and integrate it with the Netris-managed fabric.
Understanding the Network Layout
eno1:
Connected to the Out-of-Band (OOB) switch.
Used for administrative tasks, package installation, and emergency access.
This interface will remain separate from the Netris fabric.
eno2 and eno3:
Connected to leaf1 and leaf2 switches in the Netris fabric, respectively.
These interfaces will be bonded to form bond0, ensuring link redundancy and better throughput through LACP (Link Aggregation Control Protocol).
bond0:
This bonded interface will carry all traffic routed through the Netris-managed network.
It will use an IP address within the 10.99.0.0/21 subnet for communication with CloudStack resources and the Netris fabric.
Netplan Configuration
Below is a Netplan configuration file to set up the network:
network:
  ethernets:
    eno1:
      addresses:
        - 10.254.96.39/24
      routes:
        - to: 10.254.95.0/24
          via: 10.254.96.1
    eno2:
      dhcp4: false
      dhcp6: false
    eno3:
      dhcp4: false
      dhcp6: false
    eno4:
      dhcp4: false
      dhcp6: false
  bonds:
    bond0:
      interfaces:
        - eno2
        - eno3
      addresses:
        - 10.99.1.1/21
      nameservers:
        addresses:
          - 1.1.1.1
          - 8.8.8.8
        search:
          - netris.local
      routes:
        - to: default
          via: 10.99.0.1
      parameters:
        mode: 802.3ad
        lacp-rate: fast
        transmit-hash-policy: layer3+4
        mii-monitor-interval: 100
Explanation
eno1 Configuration:
Assigned an IP address (10.254.96.39/24) for OOB management access.
A static route is added to ensure that the CloudStack Management Server communicates with the Netris API via the OOB network (10.254.95.0/24 via 10.254.96.1).
eno2 and eno3 Configuration:
These interfaces are explicitly disabled from DHCP to avoid conflicts as they are part of bond0.
bond0 Configuration:
Bonded interface combines eno2 and eno3 for link redundancy and throughput.
Configured with the 10.99.1.1/21 IP address for connectivity within the CloudStack Management subnet.
Nameservers (1.1.1.1 and 8.8.8.8) and search domain (netris.local) ensure proper DNS resolution.
A default route (via 10.99.0.1) directs traffic to the gateway.
Netris Fabric Integration - From the Netris side, no manual configuration is required for the bonded interface. - Once the server is connected, the Netris fabric will detect LACP packets and automatically configure EVPN-MH (MultiHoming) for redundancy.
Verification:
After applying the Netplan configuration, use the following commands to verify:
sudo netplan apply
Check that bond0 is up and operational with the correct IP and default route.
ip addr show bond0
ip route show
Confirm that LACP is working by checking the bond status:
cat /proc/net/bonding/bond0
Best Practices
Keep eno1 isolated from the Netris fabric to ensure uninterrupted OOB management access.
Regularly monitor the bond interface (bond0) for any link failures or misconfigurations.
Install Netris-CloudStack Agent on Hypervisor Servers
The netris-cloudstack agent acts as a bridge between CloudStack and the Netris Controller. It automates the provisioning and configuration of network resources required for CloudStack’s operations on hypervisor nodes.
Bringing Up NICs Before Installation
For proper network initialization, ensure all NICs connected to the Netris fabric are brought up before installing the agent.
Run the following command for each NIC that is physically connected to the fabric:
ip link set ens3 up
ip link set ens4 up
ip link set ens5 up  # Repeat for all NICs
To verify, run:
ip link show | grep 'state UP'
Ensure all NICs are in the UP state before proceeding.
Note
If your infrastructure does not have an OOB network, your hypervisors will not have internet access. Follow the pre-installation steps below to temporarily configure internet access before proceeding with the installation.
If you have an OOB network, proceed directly to Installation Steps.
Pre-Installation Steps (For Deployments Without OOB)
Warning
These steps are only for users without an OOB network. If your hypervisors already have internet access via OOB, skip this section.
Assign an IP address to the hypervisor’s NIC connected to the Netris fabric:
ip address add 10.55.1.1/21 dev ens3
Set a temporary default route via the temporary OOB gateway:
ip route add default via 10.55.0.1 metric 10
Set DNS resolvers to enable domain name resolution:
echo "nameserver 1.1.1.1" > /etc/resolv.conf
echo "nameserver 8.8.8.8" >> /etc/resolv.conf
Verify connectivity:
ip addr show ens3      # Ensure the IP is assigned
ping -c 4 10.55.0.1    # Check connectivity to the temporary gateway
ping -c 4 1.1.1.1      # Check external connectivity
curl -I https://www.google.com  # Verify internet access
After confirming connectivity, proceed with the Netris-CloudStack Agent installation.
Key Functions of the Netris-CloudStack Agent
Bridge Management:
Automatically creates and configures the cloudbr0 bridge on hypervisors based on the JSON configuration provided during setup.
Ensures the bridge is correctly associated with the CloudStack Management Network.
Network Automation:
Configures VXLAN overlays to extend Layer 2 networks across the Netris fabric.
Integrates with Netris EVPN to enable dynamic exchange of MAC and IP address information.
Installation Steps
To provision the netris-cloudstack agent on the hypervisor servers (Server 2-4):
Navigate to: Net → Inventory.
Locate the desired server node (e.g., Server 2).
Click the three vertical dots (⋮) on the right-hand side of the node and select Install Agent.
A one-line installer command will appear. Copy this command to your clipboard.
Note: Each installer command is unique to the specific node.
SSH into the server and execute the copied command:
Repeat this process for each hypervisor server (Servers 2, 3, and 4).

Example Successful Output of One-Liner Script
Below is an example of a successful installation output after executing the one-liner script on a hypervisor server:
root@Server-2:~# curl -fsSL https://get.netris.io | sh -s -- --lo 10.0.8.2 --controller netris.example.com --ctl-version 4.4.0-011 --hostname Server-2 --auth UTuO5CvRGtlaHFpnwGRHCBGeEwxerpr2uLuDIbBc --node-type acs_hyper
=== Installing Netris-CloudStack Agent ===
+ Configuring the Netris repository...
+ Updating list of available packages
  * Proceeding with the new version of netris config files
+ Configuring Netris-CloudStack Agent
+ Enabling bgpd in FRR
+ Restarting FRR service
+ Starting Netris-CloudStack Agent service
=== Netris-CloudStack Agent is now installed! ===
+ Get started with Netris: https://netris.io/docs/en/stable/
Verification Steps
Check the agent service to ensure it is running:
systemctl status netris-cloudstack-agent.service
Confirm that the `cloudbr0` bridge has been created and has the correct IP address:
ip addr show cloudbr0
—
Checking Network Connectivity
Note
If your infrastructure has an OOB network, and Underlay was enabled during link setup, you should be able to ping the VXLAN gateway (e.g., 10.100.0.1) now.
If your infrastructure does not have an OOB network, and Underlay is still disabled, you will NOT be able to ping the VXLAN gateway yet. Proceed to the next step to enable underlay.
Verify connectivity:
ping -c 4 10.100.0.1 # This should work if underlay is enabled.
Skip connectivity checks for now.
Proceed to Enabling Underlay for Hypervisors in the next step.
—
Finalizing the Network Setup
Note
If your infrastructure did not have an OOB network, and you created a temporary OOB VNet, now is the time to switch from the temporary connection to underlay networking.
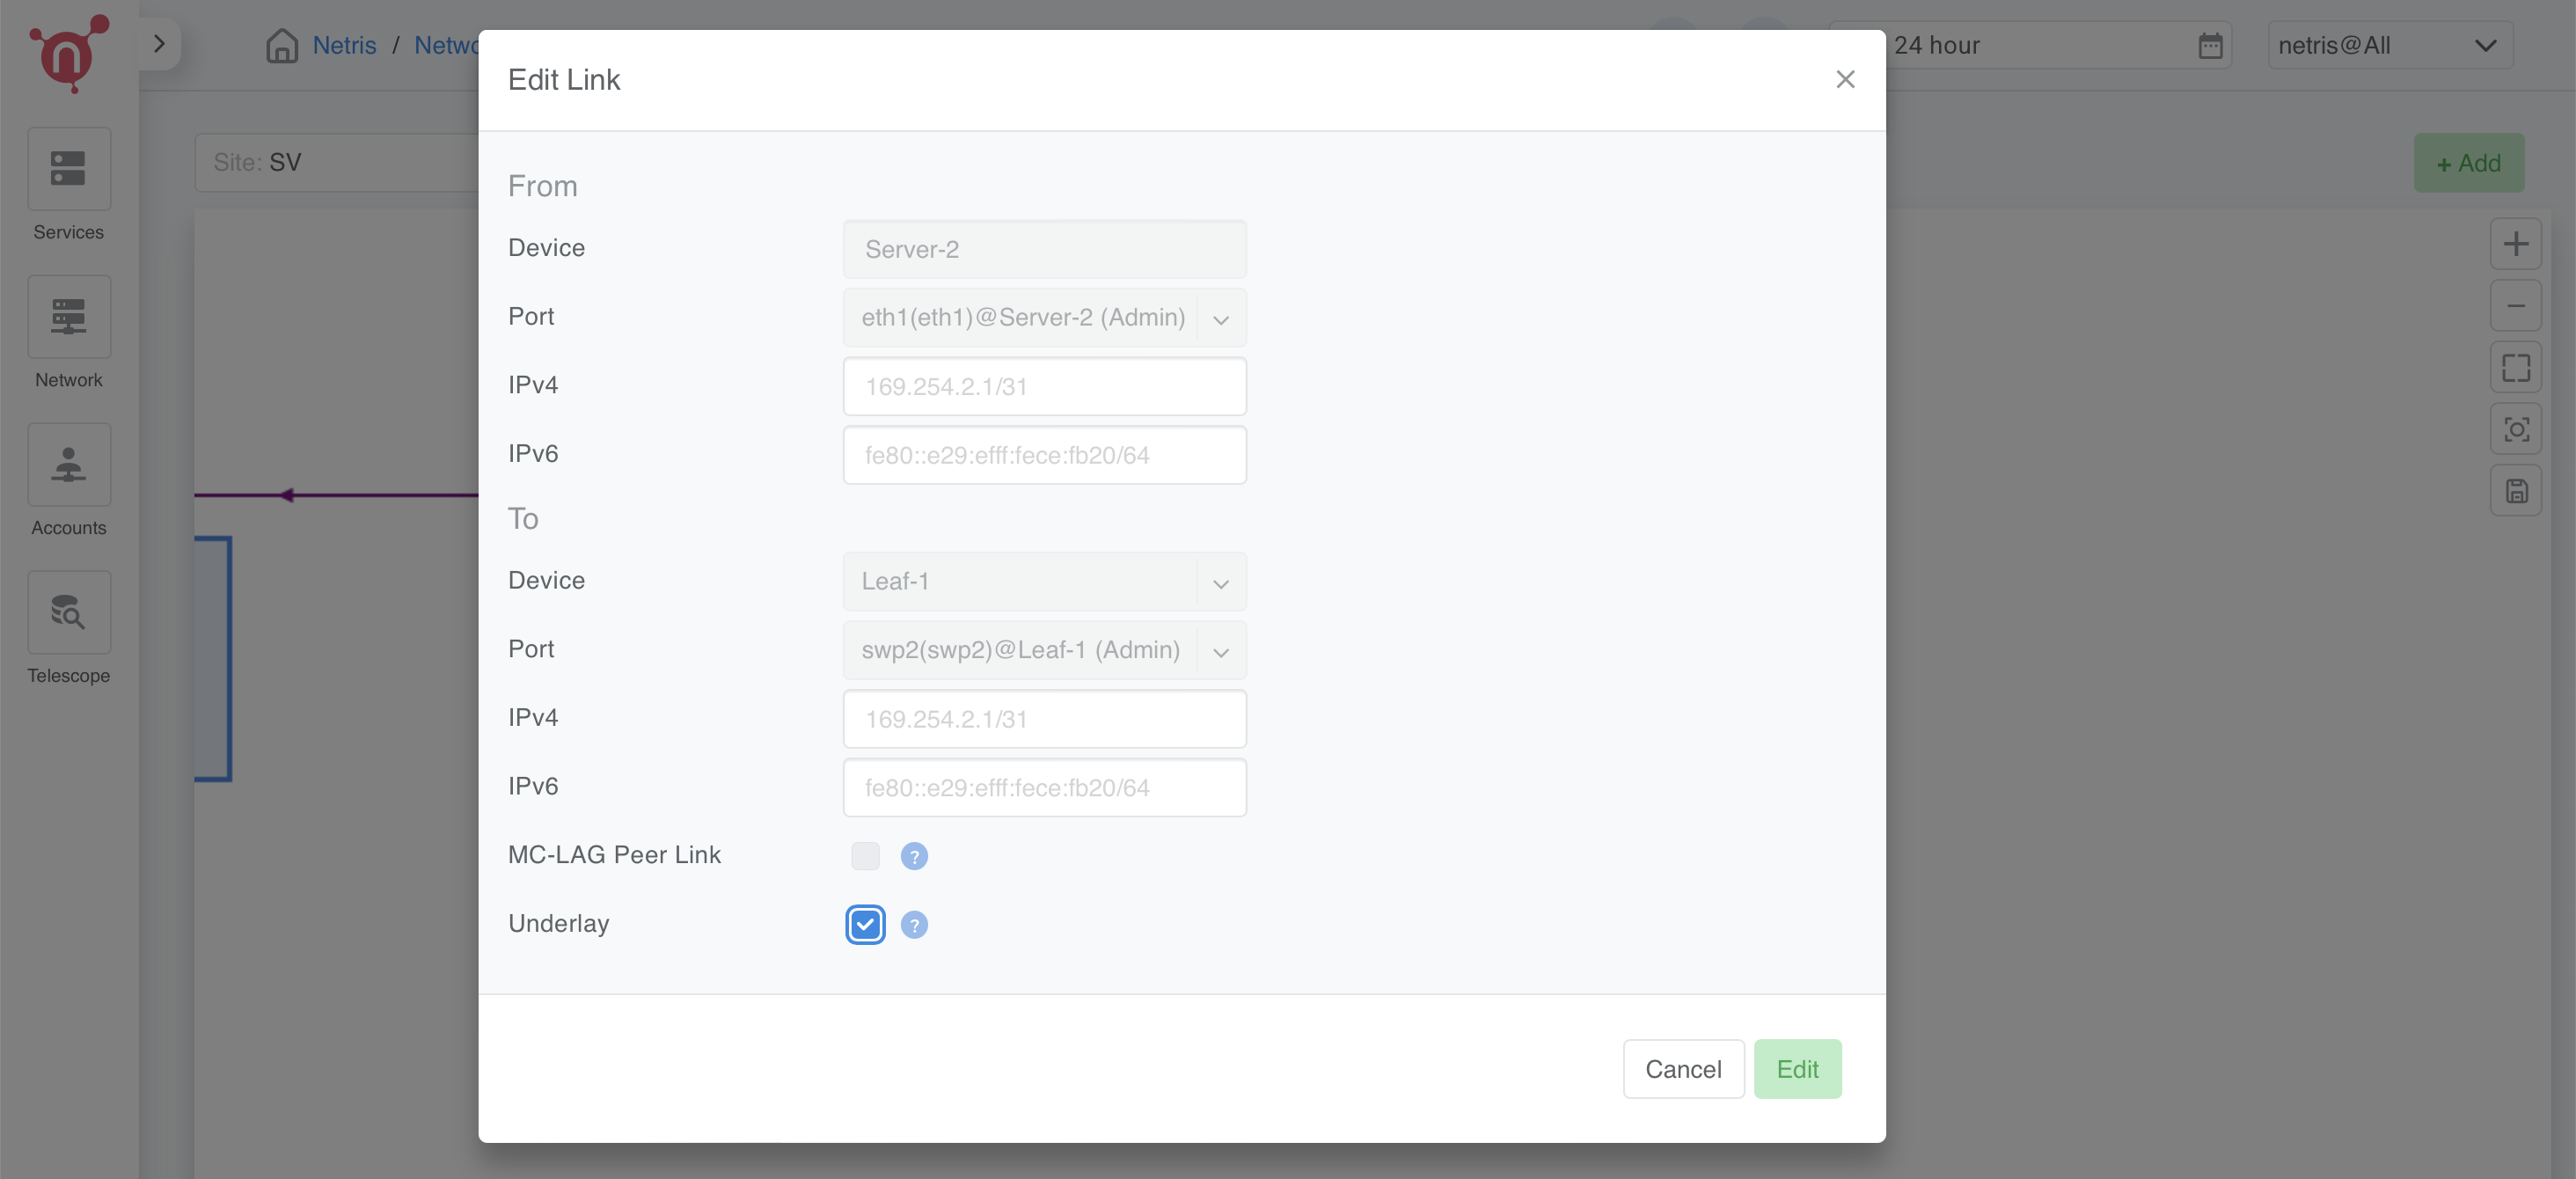
Step 1: Enable Underlay for Hypervisor Links
Navigate to: Netris Controller → Net → Topology.
Find the hypervisor’s links (e.g., Server 2 → Leaf-1).
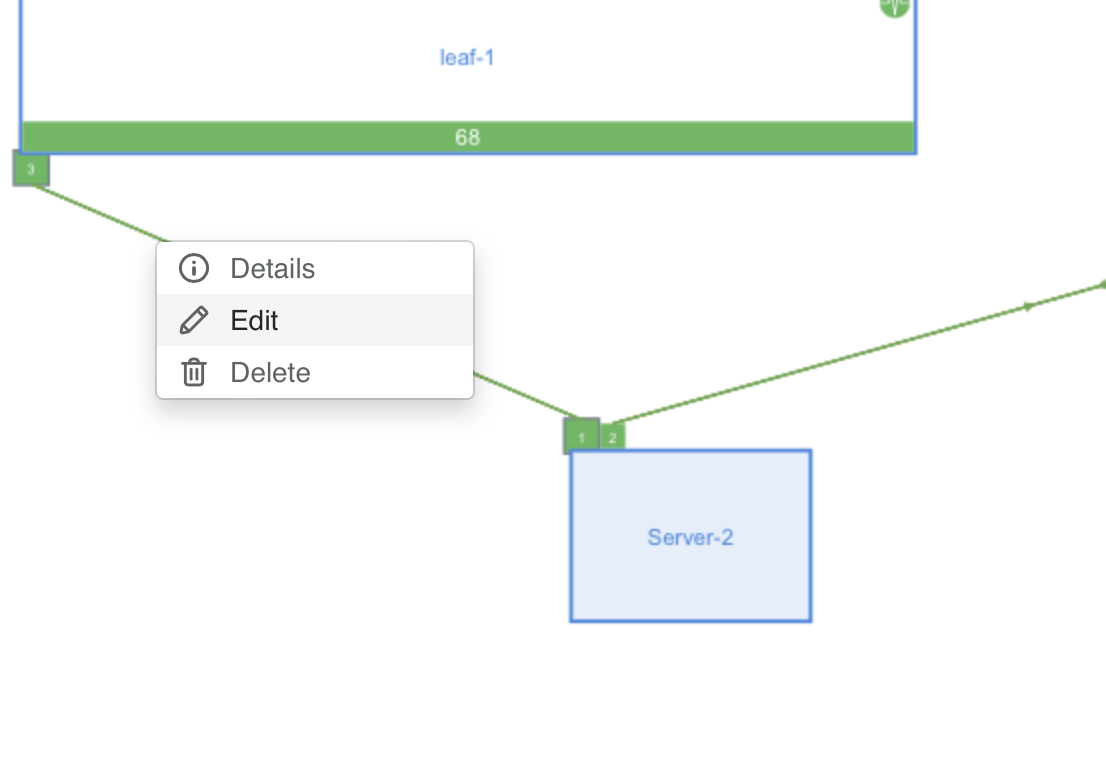
Right-click on the link and select Edit.
Enable the “Underlay” checkbox.
Click Save.
Repeat for all hypervisors (Server 2, 3, and 4).
Step 2: Verify VXLAN Connectivity
Reconnect to the server using the new cloudbr0 IP:
ssh root@10.100.1.1Confirm that the gateway of the VXLAN VNet is now reachable:
ping -c 4 10.100.0.1 # Now the gateway should respond
Step 3: Remove Temporary Configurations
Delete the temporary default route:
ip route del default via 10.55.0.1
Verify that the server is now using `cloudbr0` for network access:
ip route show
ip addr show cloudbr0
ping -c 4 1.1.1.1
curl -I https://www.google.com
Keeping the Temporary OOB VNet for Emergency Access
Note
If your infrastructure does not have a dedicated OOB network, you can retain the temporary VNet as an emergency access method.
Why Keep the Emergency OOB?
Allows access to the hypervisors if underlay networking fails.
Can be used for troubleshooting or upgrades without disrupting the overlay network.
Provides a backup path to manage servers without depending on cloudbr0.
How to Use Emergency OOB?
Disable underlay on a hypervisor link:
Navigate to Net > Topology, edit the link, and uncheck “Underlay”
Reconnect to the hypervisor using the OOB IP:
ssh root@10.55.1.1Perform necessary maintenance, then re-enable underlay when done.
Note
Persisting OOB IP Configuration (Recommended)
For long-term usability, configure the emergency OOB IP persistently using Netplan:
Managing Additional NICs on the Server
After the Netris-CloudStack Agent is installed and operational, it’s important to understand how networking is handled for other NICs on the hypervisor.
Netris-CloudStack Agent Only Configures Underlay NICs
The Netris-CloudStack Agent only configures NICs that have their link marked as underlay in Netris.
Any other NICs on the server will remain untouched by the agent.
This means that you can configure and use other NICs just like on a normal server.
Where Does Netris-CloudStack Agent Store Network Configurations?
The Netris-CloudStack Agent configures the networking for underlay-enabled NICs using the following Netplan configuration file:
/etc/netplan/10-netris.yaml
The agent does not modify any other files.
How to Configure Additional NICs Manually?
If you need to configure other NICs on your server (e.g., for additional network connections, storage networks, or monitoring purposes), do not modify `/etc/netplan/10-netris.yaml`.
Instead, create a new Netplan configuration file (e.g., /etc/netplan/05-custom.yaml):
sudo vim /etc/netplan/05-custom.yaml
Add your custom network settings. For example:
network:
  version: 2
  ethernets:
    ens5:
      dhcp4: no
      addresses:
        - 192.168.50.10/24
Save the file and apply the new configuration:
sudo netplan apply
Important Warning: Restart FRR After Netplan Apply
Whenever you run `netplan apply`, it may remove BGP routes that the Netris-CloudStack Agent has established through FRR.
This can cause connectivity issues, especially for BGP sessions that depend on those routes.
Workaround: Restart the FRR service every time after running `netplan apply`.
sudo systemctl restart frr
This ensures that all BGP routes are properly re-established after Netplan makes changes.
Summary
✔ The Netris-CloudStack Agent only manages underlay-enabled NICs, and other NICs are fully customizable.
✔ Always use a separate Netplan file (e.g., /etc/netplan/05-custom.yaml) for any manual network configurations.
✔ If you apply Netplan changes (`netplan apply`), always restart FRR afterward to prevent network disruptions.
Install CloudStack Management Service
The user is responsible for installing the CloudStack Management service. You are free to follow your preferred method for installation. Netris isolation method is officially available in CloudStack starting from version 21.
For earlier access, the development version is available at ShapeBlue’s repository:
Repository URL: http://packages.shapeblue.com/cloudstack/custompublic/kapik/
Installation Steps
Follow these steps to install the CloudStack Management service:
Create the keyring directory:
mkdir -p /etc/apt/keyrings
Add the repository key:
wget -O- http://packages.shapeblue.com/release.asc | gpg --dearmor | sudo tee /etc/apt/keyrings/cloudstack.gpg > /dev/null
Add the repository:
echo deb [signed-by=/etc/apt/keyrings/cloudstack.gpg] http://packages.shapeblue.com/cloudstack/custompublic/kapik/debian/4.20 / > /etc/apt/sources.list.d/cloudstack.list
Update the package list:
apt-get update -y